Item Routing
Who needs hoppers? Blood magic has a versatile and flexible item routing network, with a variety of filters to sort every need.
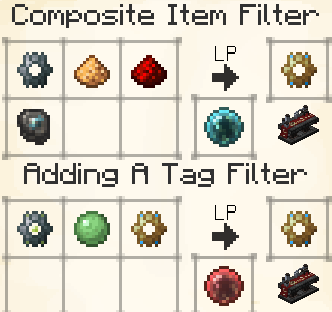
Composite Item Filter
The Composite Item Filter does nothing on its own, but when combined with another type of Filter, it allows you to apply that filter's rules to it. This means you can, for example, use the Enchantment Filter's 'Any Enchantments' and the Tag Filter's 'forge:swords' to only allow enchanted swords to pass through.
Similarly to the Standard Item Filter, it has a quantity selector and an allow/deny function. Leaving the quantity blank defaults to 'all'. Other buttons will appear on the GUI as you combine it with other filters.
Enchantments Item Filter
The Enchantments Item Filter lets you sort items via any Enchantments that they may (or may not) have. It operates similarly to the Standard Item Filter, particularly with regards to the quantity and allow/deny functions, but with a few extra buttons.
Any enchanted book will work for this recipe.
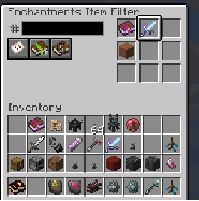
Note the two new buttons to the right of the 'Allow' button.
The first button allows you to select whether to match Every Enchantment on an enchanted item, Any Enchantment, or one particular enchantment. The second button allows you to specify whether to pay attention to the level or not. (E.G. 'Protection III' versus 'Protection').
If you insert an unenchanted item into the filter, you can effectively Allow or Deny any sort of enchantment to be inserted into or removed from the specified inventory.
Filter Parts

Filter Parts are an integral component in all Filters. They have no use on their own.
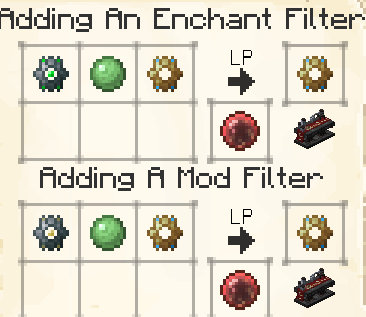
Mod Item Filter
The Mod Item Filter lets you select up to 9 items from different mods. Similarly to the Standard Item Filter, it has a quantity selector and an allow/deny function. Leaving the quantity blank defaults to 'all'.
For each item that you put into this filter, any item from the same mod will be matched.
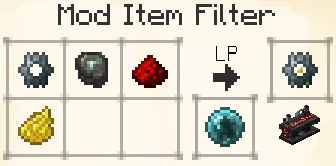
This allows you to deny/permit entire swathes of items. Handy for sorting all of your Blood Magic items into their own super-special chest, to name an example at random.
Node Router
The Node Router is used to link Nodes together into a Network. Its functionality is straightforward - Simply sneak-right-click while aiming at a node, then do the same to another node within 16 blocks. These two nodes are now linked. If you want to de-select a node, right-click on any other block. See the entry on Routing Nodes for more information.

A slightly magical stick.
Routing Nodes
Hauling items around by hand may be all right for some people, but we are a Sanguimancer. What's more, we have access to Demon Will! Surely there's a better way to go about things.
As such, you've managed to come up with Routing Nodes. These offer a powerful way to transport, sort, and filter items, sending them magically through the air as you decree.
Routing Node Networks have three main components: Input Nodes, Output Nodes, and the Master Routing Node.
Every network requires exactly one Master Routing Node, and every other Node in the network must be able to trace a route back to the Master, whether directly, or via other Nodes.
Input and Output nodes can withdraw or insert items from any block with an accessible inventory, respectively.
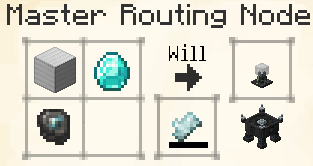
The Master Node will be able to accept upgrades in the future, but for now it only serves to control and direct the network, acting as its 'Brain'.
A Master Routing Node is all well and good, but without the other two node types, it's not particularly useful on its own, so let's get on to those next.
Input Routing Nodes _draw items into the network, _Output Routing Nodes export them out again, and plain old Routing Nodes serve to extend the reach of your network. As Input and Output nodes are currently otherwise identical, we will be focusing on the Input Routing Node unless otherwise specified.
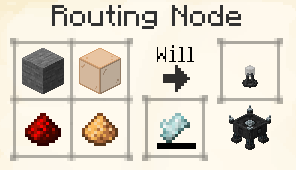
Doesn't do a whole lot on its own, but can be used to extend Routing Networks beyond the 16-block reach of a single connection.
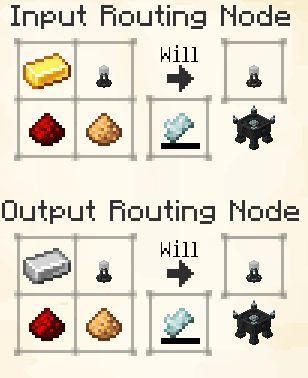
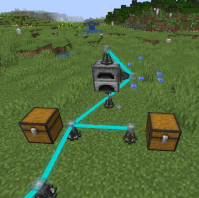
When you place an Input or Output Node down, it will automatically connect to all adjacent inventories, but it won't do anything without a Filter of some kind in at least one of its side's slots. For example, you could use a Standard Item Filter set to _Iron Ore _on top of a Furnace, a second Output Node with a Filter set to coal on the side of the furnace, and an Input Node underneath set to Iron Ingots.
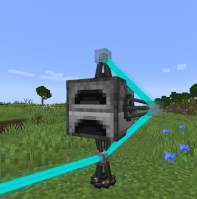
An Output Node in-world.
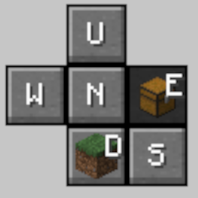
Once we've got our nodes set up, let's open up the Node GUI.
Over on the right, we have our cardinal directions - Down, Up, North, South, West, and East. You'll notice that a little picture of a block appears on some buttons, representing what's on that side of the node. The GUI will open up on a side facing an attached inventory, or Down if no inventory is present. The buttons themselves follow the direction the player is facing, so the top button is 'forwards', the left button is 'left', etcetera.
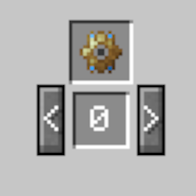
Over on the left, you'll see a space for us to insert a Filter for the selected side, and a Priority. bigger numbers = more important.
Nodes can have one filter per side - so we'll select the side we want, and put our filter in it. (For more information on Filters, see 'A Primer On Filters')
Once your Input and Output Nodes have been set up, have been linked together with the help of a Node Router in a network that includes exactly one Master Routing Node, and both have item filters inserted to the correct sides, you should be good to go! Items will be routed according to the priorities and the rules contained within your filters.
Nodes do not have to be linked directly to the Master Routing Node, merely to any node on the network.
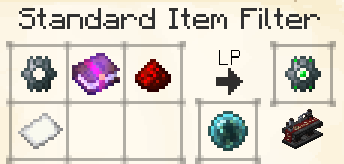
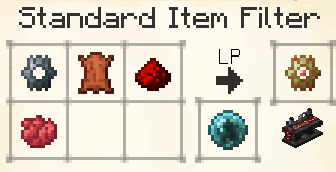
Standard Item Filter
The Standard Item Filter lets you select up to 9 items to withdraw from, or insert into, the adjacent inventory when inserted into a Routing Node.
Each item has a quantity - leaving this blank will default to 'all'.
The Filter also has an Allow and Deny function. In Deny mode, quantities are ignored.
When used in an Input Routing Node, the quantity tells the node how many of that item to leave in the selected inventory. Anything above this amount will be imported into the network.
When used in an Output Routing Node, the quantity tells the node how many of that item to fill in the selected inventory with. Anything above this amount will be left in the network - either passed into another valid inventory, or left where it is if no valid inventory exists.
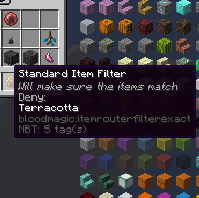
The GUI and the mouseover text of a configured filter.
Tag Item Filter
The Tag Item Filter lets you select up to 9 items and filter by their associated Tags. Similarly to the Standard Item Filter, it has a quantity selector and an allow/deny function. Leaving the quantity blank defaults to 'all'.
For each item that you put into this filter, you can select whether to match items based on one specific tag, or any of its tags.
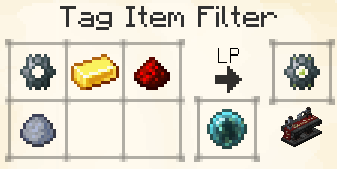
This allows you to deny/permit categories of items, so you can specify that all items with the tag forge:ores get sent to your furnace, for example.
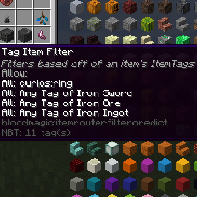
The GUI and the mouseover text of a configured filter.
Upgrades
Currently, only one Upgrade is available for the Routing Network.
The Basic Routing Logic Upgrade increases the total amount of items transferred per operation. (once per second, currently). By default, the network will transfer 16 items at a time, but each of these will raise that cap by 8.
These upgrades stack to 16, allowing for a sum total of 144 items to be transferred per second. Note that this can be split over multiple stacks, if many different items need to be transferred at once.

Minimum: 400 will
Drained: 50 will